Upgrading your bathroom is one of the most effective ways to enhance both comfort and property value. Among the many fixtures, the toilet plays a vital role in functionality, style, and water efficiency. Glacier Bay toilets, known for their modern designs and reliability, are a top choice for homeowners looking to balance affordability with quality. Installing one yourself may sound intimidating, but with the right guidance, it can be a smooth, rewarding project. This article will walk you through the process of installing a Glacier Bay toilet while also highlighting the unique features that make these toilets stand out.
Preparing for the Installation
Before beginning the installation, it’s essential to gather all the necessary tools and supplies. Glacier Bay toilets generally come with most of the parts required, but you’ll still need some basic tools:
-
Adjustable wrench
-
Flathead screwdriver
-
Utility knife
-
Wax ring or wax-free seal (depending on your preference)
-
Level
-
Tape measure
-
Bucket and sponge (to clear out excess water)
Next, turn off the water supply to the old toilet and flush it to remove as much water as possible. Use a sponge or towel to soak up any remaining water in the tank and bowl. Disconnect the water supply line, then unbolt and remove the old toilet. Make sure to scrape away the old wax seal on the flange to prepare for the new installation.
Step-by-Step Guide to Install a Glacier Bay Toilet
-
Install the Wax Ring
Place the new wax ring onto the closet flange. This ring creates a watertight seal between the toilet and the floor. -
Set the Toilet Bowl
Carefully lower the Glacier Bay toilet bowl onto the flange, aligning the bolts with the holes in the base. Rock it gently to compress the wax ring and create a secure seal. -
Secure the Bowl
Once aligned, use nuts and washers to secure the toilet to the flange bolts. Tighten them evenly but avoid overtightening, which can crack the porcelain. -
Attach the Tank (if separate)
If you purchased a two-piece Glacier Bay toilet, place the tank on the bowl, aligning the gasket and bolt holes. Insert the bolts and tighten them carefully to prevent leaks. -
Reconnect the Water Supply
Attach the water supply line to the fill valve at the base of the tank. Slowly turn on the water supply and allow the tank to fill. -
Check for Leaks
Flush the toilet several times while checking for leaks around the base and water connections. Adjust bolts or seals if necessary. -
Finish Up
Install the toilet seat (usually included), caulk around the base for a neat finish, and your new Glacier Bay toilet is ready to use.
Features of Glacier Bay Toilets
In the middle of this installation process, it’s worth highlighting why Glacier Bay toilets are such a popular choice for modern bathrooms. They are more than just functional fixtures; they bring a balance of design, performance, and eco-friendliness.
-
Water Efficiency: Many Glacier Bay models are WaterSense certified, meaning they use less water per flush while maintaining strong flushing power. This helps conserve resources and lower utility bills.
-
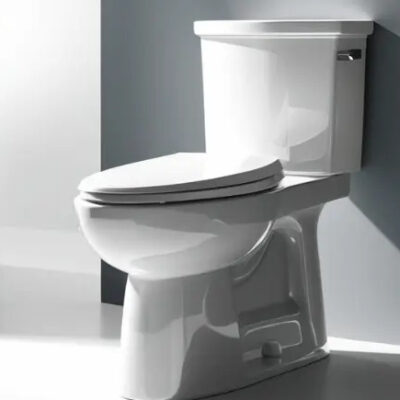
Modern Designs: Whether you prefer a sleek one-piece design or the classic two-piece style, Glacier Bay toilets offer options that fit seamlessly into contemporary bathroom aesthetics.
-
Comfort Height Options: Some models come with chair-height seating, making them more comfortable for adults and seniors.
-
Reliable Flushing Systems: Equipped with advanced flushing technology, Glacier Bay toilets minimize clogs and ensure consistent performance.
-
Easy Maintenance: Their smooth surfaces and high-quality finishes resist stains, making them easy to clean and maintain.
-
Affordable Quality: Unlike many high-end brands, Glacier Bay provides quality toilets at a budget-friendly price, making them accessible for homeowners without compromising on performance.
These features demonstrate why Glacier Bay toilets are considered a smart investment for modern bathroom upgrades.
Benefits of DIY Installation
Choosing to install your Glacier Bay toilet yourself comes with several advantages. First, it saves money on professional installation costs. Second, it provides a sense of accomplishment and allows you to complete the project at your own pace. Glacier Bay toilets are designed with user-friendly instructions, so even beginners with basic DIY skills can manage the installation successfully.
Moreover, doing it yourself gives you greater control over the process. You’ll understand how the toilet is installed, which makes troubleshooting easier if issues arise in the future.
Tips for a Successful Installation
-
Double-Check Measurements: Before buying your Glacier Bay toilet, measure the rough-in (distance from the wall to the center of the flange) to ensure compatibility.
-
Use a Wax-Free Seal: While wax rings are traditional, wax-free seals can be easier to work with and less messy.
-
Tighten Evenly: Always tighten bolts evenly to avoid cracking the porcelain.
-
Test Before Finalizing: Flush the toilet multiple times before caulking to ensure there are no leaks.
-
Follow the Manual: Each Glacier Bay model may have slight variations, so always follow the instructions provided in the box.
Final Thoughts
Installing a Glacier Bay toilet is a practical and rewarding project that transforms your bathroom into a more efficient and stylish space. With the right tools, careful preparation, and step-by-step execution, even beginners can handle the process successfully. Beyond easy installation, Glacier Bay toilets bring modern features such as water-saving technology, comfortable designs, and reliable performance.
By choosing Glacier Bay, you not only upgrade your bathroom with a sleek, dependable fixture but also make a cost-effective and eco-conscious choice. With your new toilet installed, you’ll enjoy a fresh, modern bathroom that combines convenience, style, and lasting quality.